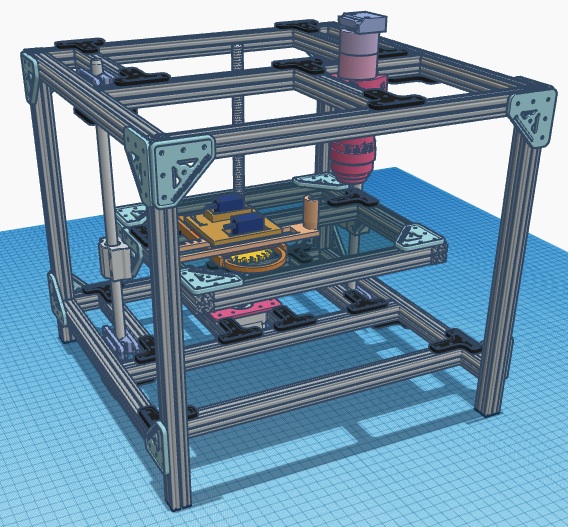
The HomeScope is a homemade RaspiCam-based microscope system capable of recording video and/or image capture (time-lapse microscopy) while robotically scanning an area of 70 x 70 mm2. We thinkered with the Cambridge’s OpenLabTools microscope and the open source drawing micro-robot PlotterBot and came up with the HomeScope; a DIY biologist solution for developing robotic spatial-scanning capabilities for the home laboratory.

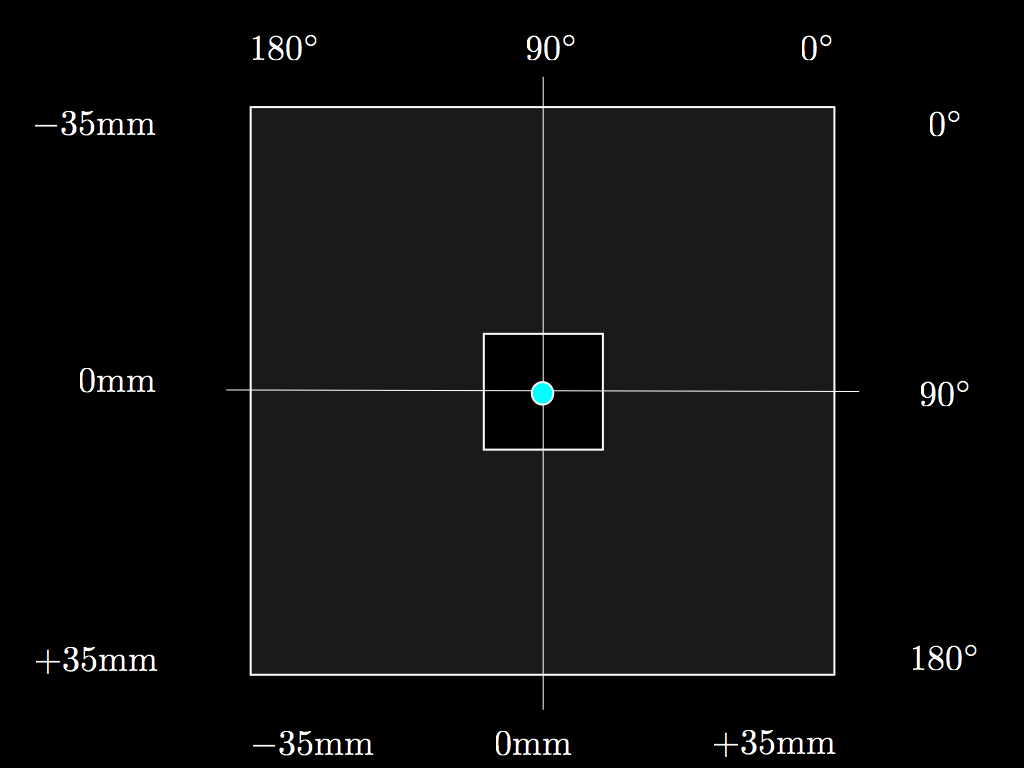
The robotic OpenStage (XY axes) is capable of scanning space by using two, very low cost and widely available, micro servos. This servos have a range of angles that goes from 0° to 180° and which translates to 70 mm of linear displacement as shown in the figure. A Nema 17 stepper motor is used for focusing (Z axis) as with the OpenLabTools design as well as with the Open FIESTA microscope. To keep our design modular we use two Arduino controllers. One to process XY movements and the other to independently control Z movements. This approach allows for the parallel evolution of the OpenStage software and hardware independently of those needed to control the focus of the optical system common to other open microscopy projects elsewhere. Although, this has the drawback of needing two Arduinos, it keeps the code and hardware development efforts modular. It also force us to think on a more network-based design for the overall electronic ecosystem making up the HomeScope. This way, the OpenStage development is independent of the development of other hardware components such as focusing, optical, illumination, and frame system. For detailed information about these subsystems we refer the reader to consult the Open FIESTA microscope step-by-step guide and installation manual. Indeed for this version of HomeScope (v.1.0), we use the same illumination and optics as in the Open FIESTA microscope. The frame is made of OpenBeam beams instead of V-slot beams and it is bigger than previous constructions (OpenLabToos and Open FIESTA variants) to accommodate a larger stage hosting the XY “plotter” robot. Another advantage of this modular approach is that the code which is developed for the Arduino controlling the Z-movements (OpenScope) can be also used to control focus on these alternative designs where no XY stage is present. A major innovation of the HomeScope is it’s OpenStage derived from a design from the PlotterBot.
Hacking the PlotterBot
 A quick hack is to re-cycle the PlotterBot, a CNC drawing micro robot. Instead of using it to draw, we can use it to hold a sample and move it in two dimensions. This way, PlotterBot can be converted into an XY stage and be used to scan an viewing area. A coordinate system is given by the range of the servo angles. We use 180 degree micro servos for each degree of freedom (X and Y). At boot up, HomeScope place the servos at 90 degrees to correspond to the center of the viewing area. The view area is smaller and it is depicted here as a small white square. The size of this area depends on the magnification of the objectives used. OpenStage translates the scanning area leaving the optical and illumination systems stationary centered at the red dot corresponding to their axis of alignment with the viewing area.
HomeScope in action
The HomeScope can be seen here with no head (optical system; only the optical clamp attached to the beam can be seen on the Top frame. To make this video, the HomeScope is control directly by a user from the Joystick (XY movement) and two push buttons (Z movement). We we see HomeScope scanning XY using the PlotterBot mechanism while at the same time moving up and down the Z axis. To hold a petri dish with agar and LB so we can observe a bacterial swarm moving in space.
HomeScope scanning bacteria
Once a optical system is attached to the clamp, HomeScope can capture video while scanning a spatial field of bacteria (paenibascillus). Thus we can use HomeScope to scan space while capturing video on real time.
HomeScope time-lapse
We can also use HomeScope to capture series of images and then make time lapses. Here we see one such time-lapses from images taken from the same petri dish.
Here on top of the time-lapse video, flashing dots are OpenCV algorithms attempting track the head of the dispersal structure. From making time-series at a fix location, we can ID local developmental structures which are pre conditional states to a mature form which is responsible for long distance dispersal. The development of this structure can be seen in the first half of the video. After a snake like structure has form it spirals around the rotating vortex and then when is about to leave the viewing are, the XY stage makes a movement in the direction of the snake’s movement. At the new stage coordinates we see a collision between two dispersal structures.