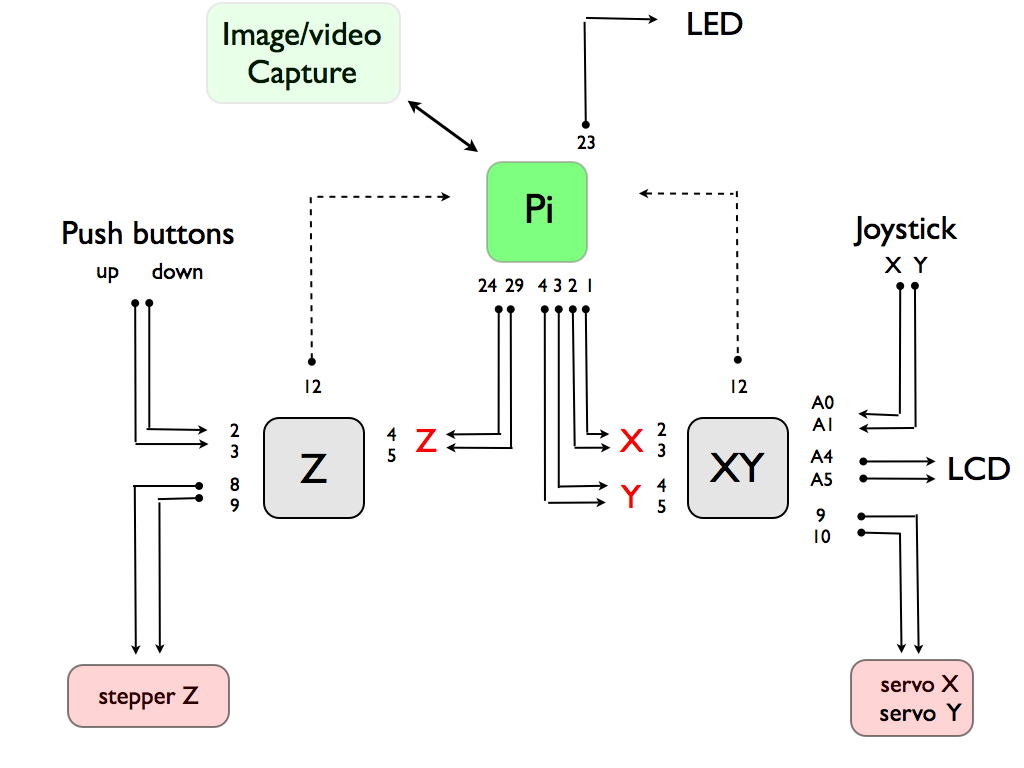
The HomeScope is made of a collection of electronic systems that need to communicate with one another.

The figure shows the connectivity pattern among different boards, computer, and other electronic components of the microscope. Actuation (movement in the X,Y,Z axes) is powered by two Arduino controllers listening to a Raspberry Pi computer controlling a Raspberry Pi camera (RaspiCAM) which is attached to an optical system (optical tubes, focal lens, objective). Each of these Arduinos is a two-state machine that can switch from a listening to an actuating state depending on sensory input. To refer to these two Arduinos on this guide, we label them: Arduino XY and Arduino Z. The Raspberry Pi also controls the LED that is used to illuminate the sample via its PWM pin. When in the actuating state, these Arduinos actuate XY and Z movements respectively. Arduino XY displays XY coordinates on an LCD as well as listening to the Joystick and the Raspberry wishes; Arduino Z listens to a couple of push buttons as well the Z wishes of the Raspberry. Movements in XY are implemented using two micro servos while movement in Z is done with a stepper motor. The Arduinos also communicate their state (listening or actuating) over PIN 12 through a one-bit representation. Currently, the Raspberry Pi ignores such signals (dotted lines in the figure) but these are needed to implement further functionality such as autofocus and spatial tracking. Note that there are multiple pin notations in the Raspberry Pi community; here we use the WiringPi notation. We port the dualism of having two Arduinos into the Raspberry Pi code design by splitting software functionality into two different applications (OpenScope and OpenStage) as explained further on this guide. We first describe the Arduino side of the system, as they define the space of movements and thus create an actuation space for the Raspberry Pi. Thus, the Arduinos define the messaging system that applications running on the Raspberry Pi can use to control the HomeScope. Different pieces of code (*.ino) run on each of the Arduinos and each one of these talks to one of the applications running on the Raspberry Pi: Arduino XY code listens to OpenStage and Arduino Z code listens to OpenScope. In the next Sections of this guide, we describe each of these Arduino codes in detail. After that, we describe the C codes (*.c) implementing the GUIs (OpenScope and OpenStage) communicating with each one of the Arduinos. These Apps are also responsible of controlling illumination (LED) and image/video capture (RaspiCAM) respectively.